Home Studio Acoustics: Sound Advice for Audio Engineers

Optimizing A Home Studio for Audio Engineers: Essential Acoustics for Professional Sound
The home studio has become a cornerstone of modern music creation, democratizing the music production process and empowering countless artists. With advancements in technology, affordable audio equipment, and digital distribution platforms, aspiring musicians and seasoned professionals are increasingly turning to their homes to craft their sound. However, your decision-making is entirely dependent on what you hear coming from your speakers.
Achieving professional-quality results often hinges on the acoustic environment of the studio space. By understanding and addressing acoustic challenges, you can significantly enhance the sound quality of your recordings and mixes. This guide will delve into the essential elements of home studio acoustics, providing practical tips and strategies to optimize your space for professional-level audio production.
Creating a great-sounding home studio doesn’t always require a massive budget or a custom-built soundproof room. Understanding the fundamentals of acoustics and implementing practical solutions can significantly enhance your recording and mixing environment. This guide will explore essential acoustic treatments, speaker placement, and digital tools to help you achieve a more accurate and enjoyable recording studio space.
Home Sound Acoustics: Understanding the Basics
Before diving into specific treatments, it’s crucial to grasp the core acoustic concepts.
There are three ways to control the sound in your space:
- Sound Reflection: when sound waves bounce off surfaces, creating echoes and reverberation.
- Sound Absorption: when materials like acoustic panels absorb sound energy, reducing reflections.
- Sound Diffusion: when uneven materials scatter sound waves, preventing echoes and creating a more even sound field.
It’s also important to understand two key concepts about how sound pressure waves travel in your space:
- Standing Waves: Low-frequency waves that bounce between parallel surfaces, causing an uneven bass response.
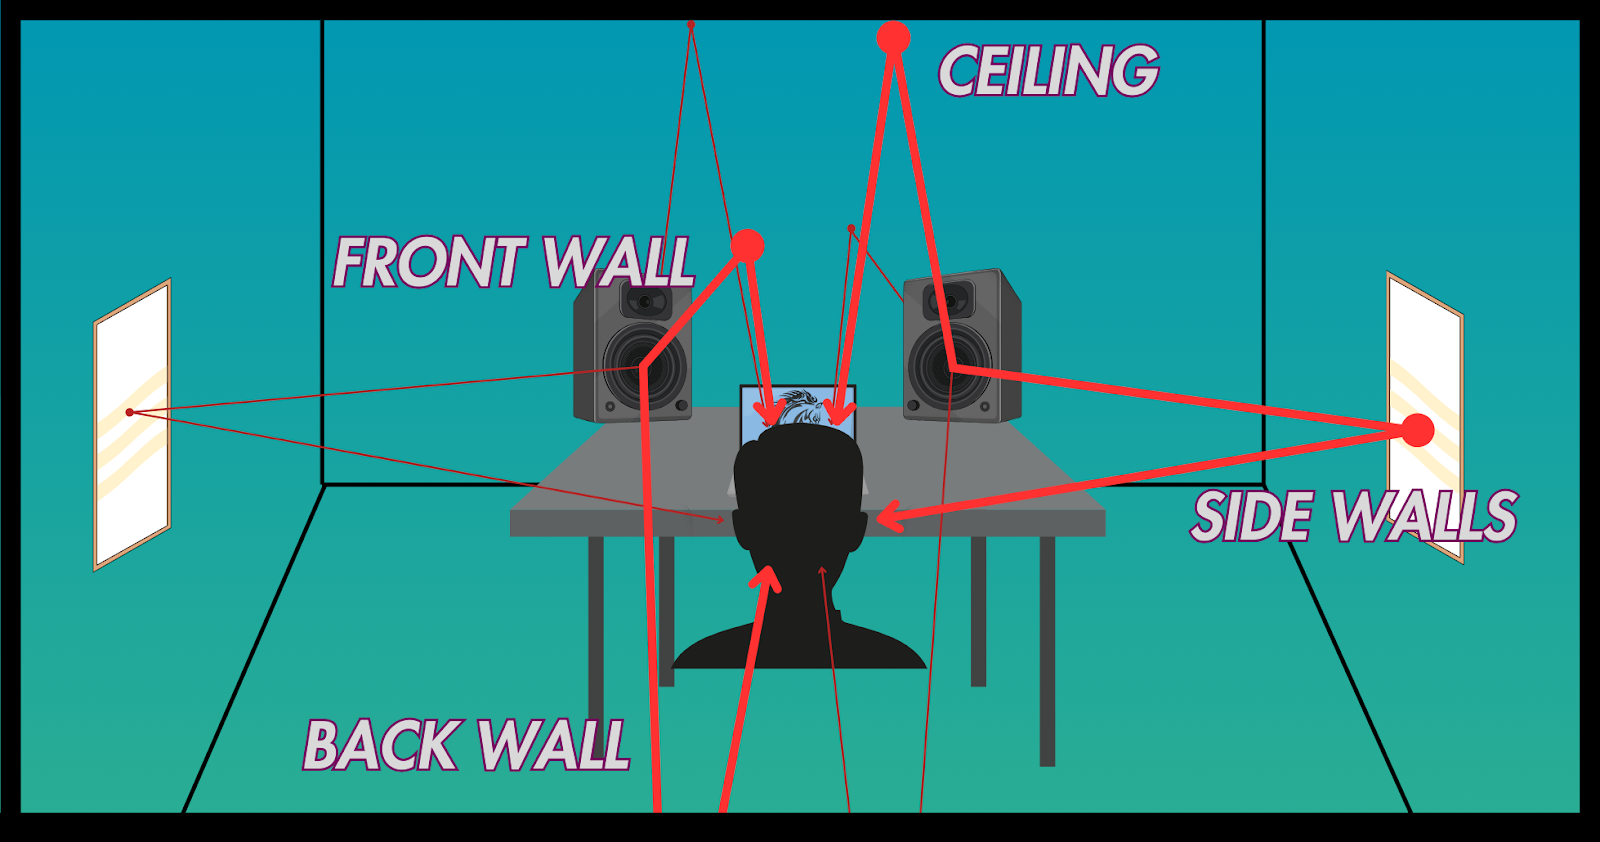
- Early Reflections: Sound waves that bounce off walls, ceiling, and floor directly to your listening position.
Measuring the Sound
Many of the techniques described in this blog can be used with a little knowledge and careful listening. However, if you are an audio engineer who makes a living from their recording and mixing decisions, you will want to be thorough with addressing your acoustics. To truly understand your room’s acoustic fingerprint, you need data.
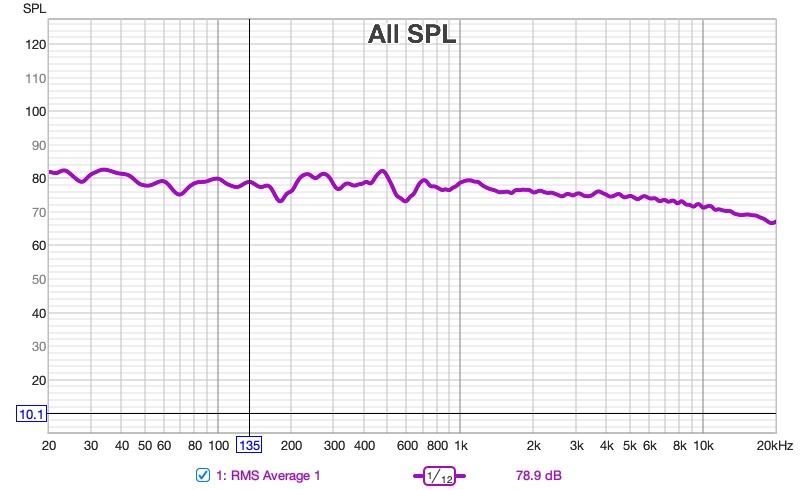
This is where Room EQ Wizard (REW) and a reference microphone come into play. REW is powerful, free software that measures and analyzes your room’s frequency response, decay times, and other critical acoustic parameters.
You gain invaluable insights into your room’s strengths and weaknesses by placing a calibrated measurement microphone at your listening position and running REW. This data-driven approach ensures that your acoustic treatments are targeted and effective, maximizing your investment and minimizing trial and error.
This software is very deep and can be daunting at first glance, but there are tons of tutorials and walkthrough videos available for the basic tasks that you need most.
Speaker Placement
Proper speaker placement is essential for achieving a balanced soundstage before dealing with progressively bigger and more expensive problems. The relationship between the speaker and the walls is more powerful than most affordable acoustic panels or treatments, so it should absolutely be the first priority.
Room Location:
Your speakers should be at an equal distance from the back wall and side walls (A) for maximum clarity.

(A)

(B)

(C)
If possible, avoid having one speaker in the corner and the other in the center of the wall (B). Ideally, you will have your mix position centered between two side walls, often on the short wall in a rectangular space, to avoid sitting centered in the room. If you need to be in a corner due to practical considerations, try placing your desk angled across the corner to create a consistent reflection on the outside of each speaker (C). Use a tape measure to be precise!y placing your desk angled across the corner to create a consistent reflection on the outside of each speaker (C). Use a tape measure to be precise!
Room Boundaries:
Generally speaking, avoid placing speakers too close to walls or corners, as this can lead to bass build-up and uneven frequency response. Experiment with your space and listen to a song with a full range low end while moving the speaker from next to the wall to about three feet away. You should listen for even balance across the low frequencies, consistent from the bottom of your speaker’s range to the midrange.
You can do this with well-mixed music by listening to the volume of each note played by a great bass. I often use the track Into The Glorious by Christy Nockels. Each note should translate the same, but it will often jump up or down with each new note in an untreated space. They are hitting different frequencies and, therefore, moving in and out of the issues in your room. Even better, take measurements in each position using REW to be precise in your placement. Use a tape measure to be precise!
The downside to placing your speaker away from the wall is that the low and low-mid frequencies will bounce off the back wall and rejoin the signal slightly delayed. This can muddy up the sound in the mix position, making you think you have more work to do. In many high-end listening environments, the subwoofers close to the walls to eliminate that, but unless the low-end buildup is “fixed” and the time is re-aligned using Digital Signal Processing software, it will be pretty unlistenable.
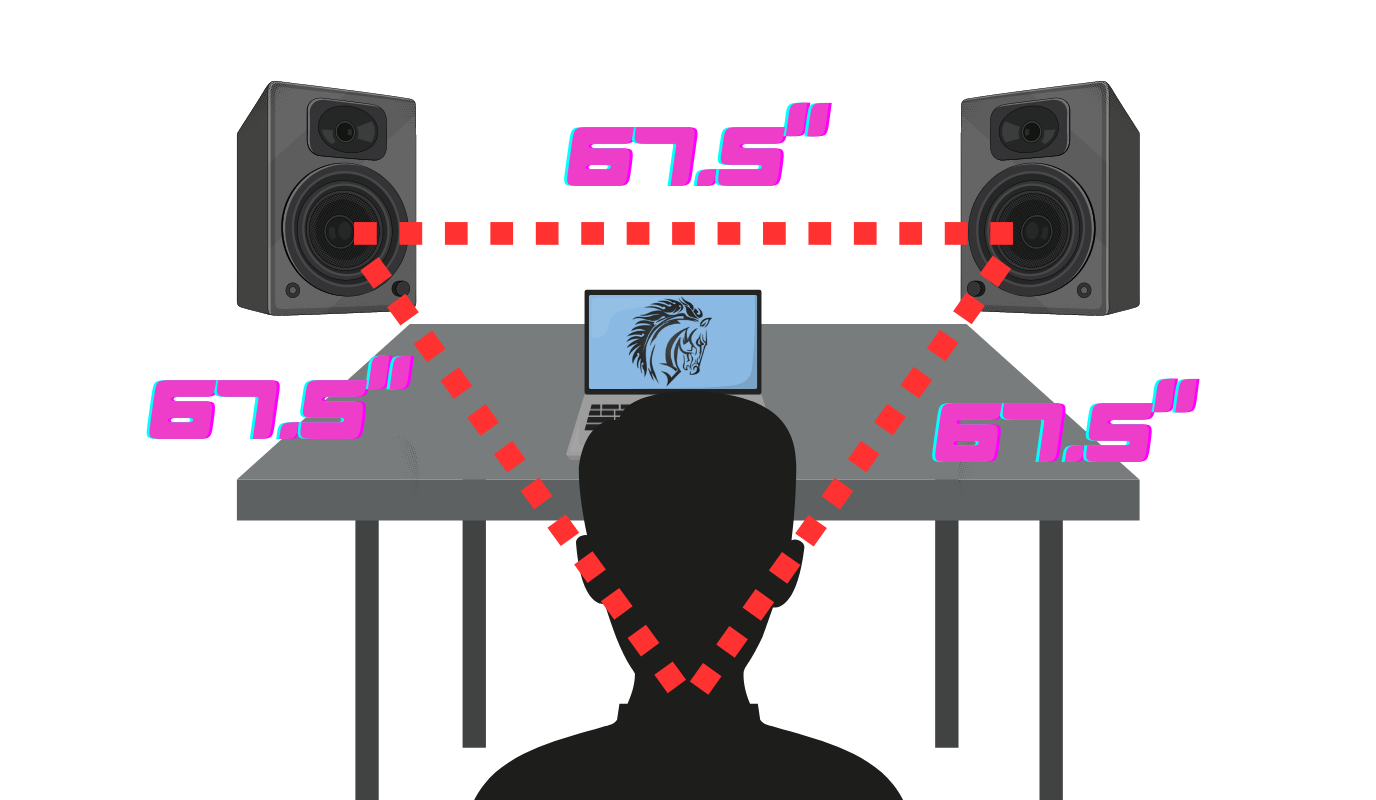
Equilateral Triangle:
Aim for an equilateral triangle between your listening position and the speakers. I typically aim the focal point of the speakers at the back of where my head will be, which will send the center line right past my ears. If your desk is very deep, and your speakers are on stands behind it, you will end up with relatively widely spaced monitors ( A ). If your desk is shallow and speakers are resting on or above the desk, they will likely need to be more close ( B ).
(A)

(B)
Use a tape measure from the center of the speaker cone to be as precise as possible. Fine-tune speaker placement by experimenting with different positions to find the optimal setup for your room. Having a helper through this process can be very helpful, as the time it takes to move speakers can make it harder to compare. When choosing the width, some people use a long, smooth board to slide their speakers across easily. This can speed up the time it takes to make changes and fair comparisons.
In an ideal placement, each instrument should sound like it floats clearly in the space between the speakers. I use a couple of songs for hearing imaging, but Change the World by Eric Clapton has some fantastic stereo placement. I’m Not In Love by Diana Krall helps me judge the clarity of the center channel.
Tackling Early Reflections
Early reflections are a common culprit for creating a harsh and uneven soundstage. These are the areas where a sound first bounces off a hard surface around the speakers and listening position. These reflections help your brain localize your position in any room, and left untreated, they will damage the imaging coming out of the speakers.
Identify Reflection Points:
You can use a mirror to find the first reflection points on your walls and ceiling. These are the areas where sound directly bounces back to your listening position. Any place you can see the speakers in the light reflection is also a sound reflection point.
Acoustic Panels:
These early reflection points are typically treated with acoustic absorption using panels made from Owens Corning 703 or Rockwool. You will get some benefit from the black foam squares available online for cheap, but typically only in the upper-middle and high frequencies. The acoustic panels’ thickness and material determine their effectiveness at absorbing different frequencies. Thicker panels and dense fiberglass like OC703 are generally better at absorbing low frequencies.
However, if you’re on a budget, use whatever you have! The dense quilted packing blankets you can pick up relatively cheap will help, especially if you double-layer them and hang them just off the wall by an inch or two. For a quick fix, I’ve flipped up mattresses, used couch cushions, and hung comforters off broomsticks. Nobody hearing your song in a year will ever see how ugly it is!
Bass Traps: Controlling Low Frequencies
Low frequencies can be challenging to control, but bass traps are an effective solution. Typically, low-frequency energy tends to build up against walls and especially corners, so this is the best place for a bass trap! There is no such thing as too much bass trapping, and in reality, few studios can afford the space and money to build a perfect acoustic environment.

There are commercially available solutions, as well as DIY options. A good starting point is loading up the corners with fiberglass or mineral wool thick panels. Still, other options include custom-tuned Helmholtz resonators, super chunks, active bass suppressors ($$$), and more.
The Amazon/Temu “bass traps” made from black foam are not likely to have much real impact in your room, although they are better than nothing. A bag (or two) of Rockwool for $80 will make a significant difference. While you’re at Home Depot (or wherever), you can pick up some light weed barrier fabric to make it pretty for far less than traditional fabric options.
Room Correction Software: Digital Assistance
After exhausting your options with placement and treatment, room correction software like Sonarworks, ARC, or MiniDSP can help compensate for acoustic imperfections in your room. These software programs use a measurement microphone to analyze your room’s acoustics and create a digital correction profile based on the measurements. Not only do they compensate for your room, but they can also help eliminate any imbalance in your speakers.
Many engineers have differing opinions on this issue, but I rarely mix without using Sonarworks and/or my primary monitor’s built-in DSP correction. It has made many sub-par speakers sound pretty good and improved room issues to the point that I feel confident in the mix I’m delivering.
Headphones: A Double-Edged Sword
You may have noticed that this is taking a lot of effort and more money than just the speakers you have saved up for. A common way to avoid all this is to simply use professional studio headphones. These can range in price from $100 to well beyond $1,000 for high-end sets.
Headphones can be a valuable tool for mixing and production, but they also have limitations. They isolate you from the acoustic environment, but they also have inherent coloration and distortion. If you use headphones, you will likely want to reference professionally released mixes often and check your work on multiple systems throughout.
Sonarworks offers one of the more popular solutions for making headphones sound as flat as possible (a good thing!). They measure each model’s response and apply an opposite EQ curve to compensate. Pictured below is the average frequency response of all the most popular headphone models so you can see the problems you might encounter while mixing through them.
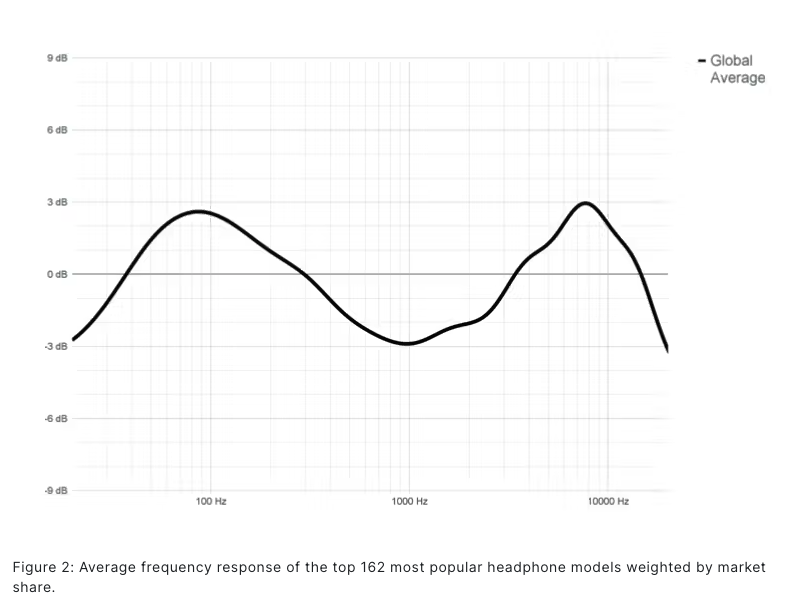
Image by Sonarworks
A relatively new home studio option is the Slate VSX modeling headphones and the Virtual Modeling from Sonarworks. These not only have EQ correction available as bundled software but also do a good job of modeling the experience of listening to a set of monitors in a professional environment. They use psychoacoustic cues to make it sound and feel like you are right there in some of the best spaces in the world. Other companies are also jumping on this trend, so you may soon have many options.
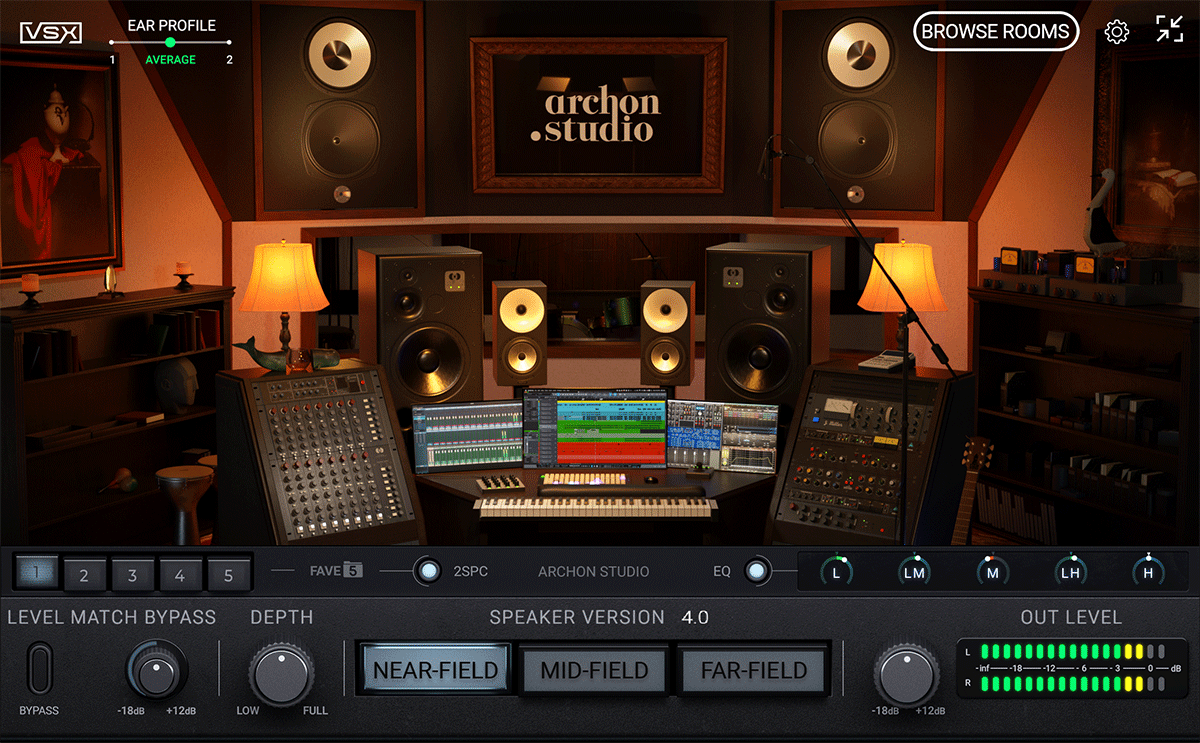
Image by Slate Digital
Additional Tips for Acoustic Improvement
Furniture Placement:
Avoid placing large furniture near your listening position, as it can reflect sound and affect the soundstage. But sometimes, a big, heavy couch in the back of the room can help tighten up the low end.
Room Shape:
Rectangular rooms tend to have fewer acoustic problems than irregular shapes. Many room mode calculators can help you determine the problems inherent in your space.
Ventilation:
Proper ventilation can help reduce humidity, which can affect the performance of acoustic materials.
Monitors:
Don’t let your computer monitors block your view of the speakers, and also, listen to ensure your screen isn’t introducing funky reflections to your sound.
Desk Top:
One of the early reflection points that often gets overlooked is the desktop surface itself. Placing something as simple as a mousepad or blanket across the desk can dramatically improve clarity. Personally, I have a folded blanket on my desk that helps cut reflections, makes it more comfortable, and lets me hide cabling.
Conclusion
Improving your home studio acoustics is an ongoing process that requires experimentation and patience. By combining acoustic treatments, speaker placement, and digital tools, you can create a more accurate and inspiring listening environment. Remember, the goal is to achieve a balanced, neutral sound that translates well to different listening systems.
But don’t let perfection get in the way of good. Many outstanding records have been made in improvised and terrible-sounding spaces, so keep working on the music and then make your life easier with a well-treated space along the way.
If you are interested in a career in the Music Industry, Dark Horse Institute’s music programs: Composition and Songwriting, Audio Engineering, or Music Business are a great way to take things to the next level!
Leave a Reply